From box to first light in four steps.
Install, power, and pair your LIFX Path Light. Follow the steps in order, or jump to the part you need. Everything below works on iOS and Android.
Path Light Setup
04 steps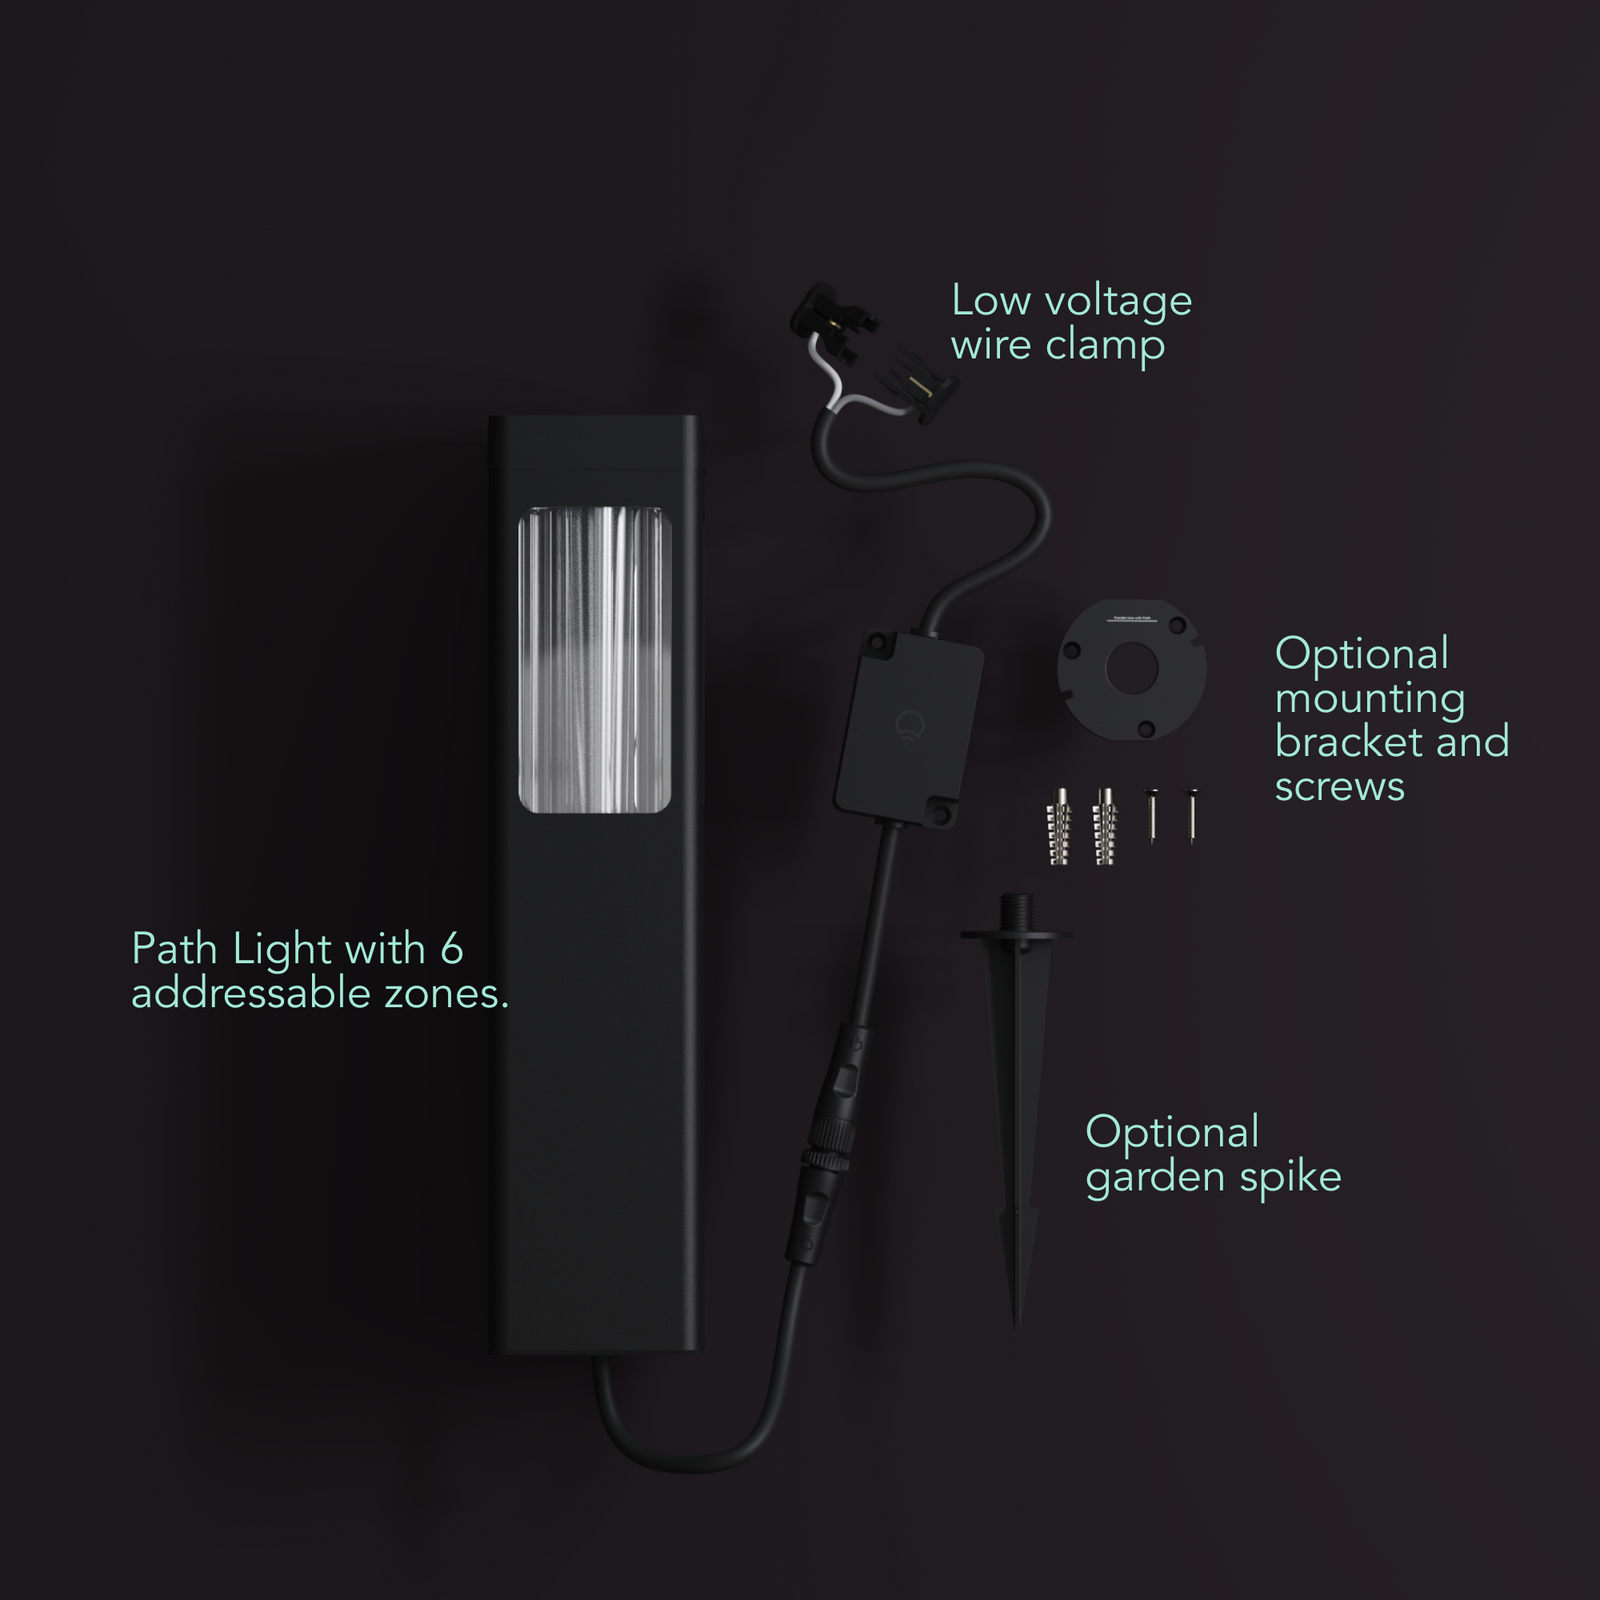
Using your existing low voltage system, everything you need to install and onboard your Path Light is included in the box.
In the box:
- LED path light (Round or Square)
- Low voltage clamp connector
- Attachable ground spike for installation into earth
- Alternative base mount and screws for installation on solid surfaces
Mains Powered (optional):
If you wish to install directly to your mains power, you will require a LIFX Outdoor Power Supply.
You’ll Need:
- A smartphone (iOS 18.0+ or Android 8.1+)
- The LIFX app (download from App Store or Google Play
- A 2.4 GHz Wi-Fi network (Most smart devices require 2.4 GHz. If your router combines 2.4 GHz and 5 GHz, that’s usually fine.)
- Your Wi-Fi password
Important Notes:
- Keep your phone near the light during setup.
- Make sure Bluetooth is enabled.
- Ensure your phone is connected to the same Wi-Fi network you want the light to use.
Installation type (choose one)
- Low voltage — connects to an existing 12V outdoor lighting transformer. Best if you already have a low voltage garden lighting system installed.
- Mains powered — uses the LIFX Power Supply Unit (sold separately) plugged into a standard outlet. Best for new installs with no existing transformer.
If using low voltage
- Check your transformer has sufficient wattage available for the additional load
- Your system must be 12V with at least 33W allowance remaining after wiring calculations
If using mains powered (LIFX PSU)
- Each light uses 24W — ensure your total load is within the PSU limit
- Allow 10% tolerance for cable runs over 20m
- Use a GFCI-protected outdoor outlet
- Mount the PSU using adhesive, timber screws, or masonry anchors (drill 6.0mm holes, insert metal anchors, attach with included screws)
- For larger installs, use both PSU output connectors to spread the load and maintain brightness over distance
Mounting method (choose one)
- Ground spike — for garden beds and in-ground locations
- Mount plate — for solid surfaces such as wood, masonry, or pavers
Ground spike steps
- Slot the Path light wire into the spike and let it hang loose.
- Screw the spike into the Path light base until secure.
- Press the spike firmly into the soil until fully underground with the light sitting on the surface. If the ground is hard, wet or dig the soil to soften it first.
Mount plate steps
- Thread the cable through the large hole in the centre of the mount plate.
- Attach the mount to the surface — screws only for wood; for masonry, drill two 1/4" holes, insert the provided anchors, then install the screws.
- Lower the Path light onto the mount, line up the notches, and twist to lock in place.
Connecting the wires
- Clamp the cable to your low voltage system wire, or connect to your LIFX PSU using the included cables.
- Connect the other end to the wire on the Path light, line up the two sides, and screw the cap over the join tightly to ensure a waterproof seal.
- Cap any unused connector ports — never leave a port uncapped.
Tips
- Do not bury wire more than 6" underground.
- Ensure all lights are raised above ground level — do not install in flood-prone areas.
- Do not submerge any part of the setup.
- Do not secure wiring with staples, nails, or sharp hooks — do not damage the wire.
- Only connect to official LIFX Outdoor products.
- To factory reset, unplug and replug the LIFX connector 5 times at roughly one per second. The light will cycle through four colors and stop on white when reset is successful.
Select your device below to get step-by-step setup instructions tailored to your phone. We recommend using the Matter QR code method for the quickest and most reliable connection — you'll find the QR code in your product manual, or printed on the back of your device.
Choose your OS
On iOS, you can set up in two ways
We recommend Matter for the most reliable setup. Use Wi-Fi if you've lost the QR code or can't access it.
iOS Onboarding via Matter QR code
- Plug in the light and power it on.
- Open the LIFX app and tap the + icon in the bottom right.
- Tap New Product, then New Light.
- Tap Scan QR Code and use the camera to scan. Alternatively, type the 11-digit Matter code from the product (or Manual).
- Tap Add to LIFX and Choose Home from the list.
- Wait for the Home app to connect to the light.
- Select a Location (e.g. Bedroom) and give it a Name (e.g. Bedside Lamp).
- You're all set.
iOS Onboarding via WiFi
- Plug in the light and power it on.
- Open the LIFX app and tap the + icon in the bottom right.
- Tap New Product, then New Light.
- Tap Set Up Device Manually.
- Go to your phone's Wi-Fi Settings:Matter: From Other Networks, select the LIFX Light.HomeKit: LIFX appears under Set Up New Device; after 15 minutes it moves to Other Networks. Select the LIFX Light from there.
- Return to the LIFX app.
- Select your Wi-Fi and enter the password.
- Wait for the light to connect via Wi-Fi (up to a minute).
- Finish setup by selecting a Group and giving it a Name.
- Opt in or out of any Suggested Routines.
- You're all set.
On Android, you can set up in two ways
We recommend Matter for the most reliable setup. Use Wi-Fi if you've lost the QR code or can't access it.
Android onboarding via Matter QR code
- Plug in the light and power it on.
- Open the LIFX app and tap the + icon in the bottom right.
- Tap New Product, then New Light.
- Tap Scan QR Code and use the camera to scan. Alternatively, type the 11-digit Matter code from the product (or Manual).
- Tap Add to LIFX and Choose Home from the list.
- Wait for the Home app to connect to the light.
- Select a Location (e.g. Bedroom) and give it a Name (e.g. Bedside Lamp).
- You're all set.
Android onboarding via Wi-Fi
- Plug in the light and power it on.
- Open the LIFX app and tap the + icon in the bottom right.
- Tap New Product, then New Light.
- Tap Set Up Device Manually.
- Select your new LIFX light when it appears.
- Select your Wi-Fi and enter the password.
- Wait for the light to connect via Wi-Fi (up to a minute).
- Finish setup by selecting a Group and giving it a Name.
- Opt in or out of any Suggested Routines.
- You're all set.