From box to first light in four steps.
Install, power, and pair your Neon Flex. Follow the steps in order, or jump to the part you need. Everything below works on iOS and Android.
Neon Flex Setup
04 steps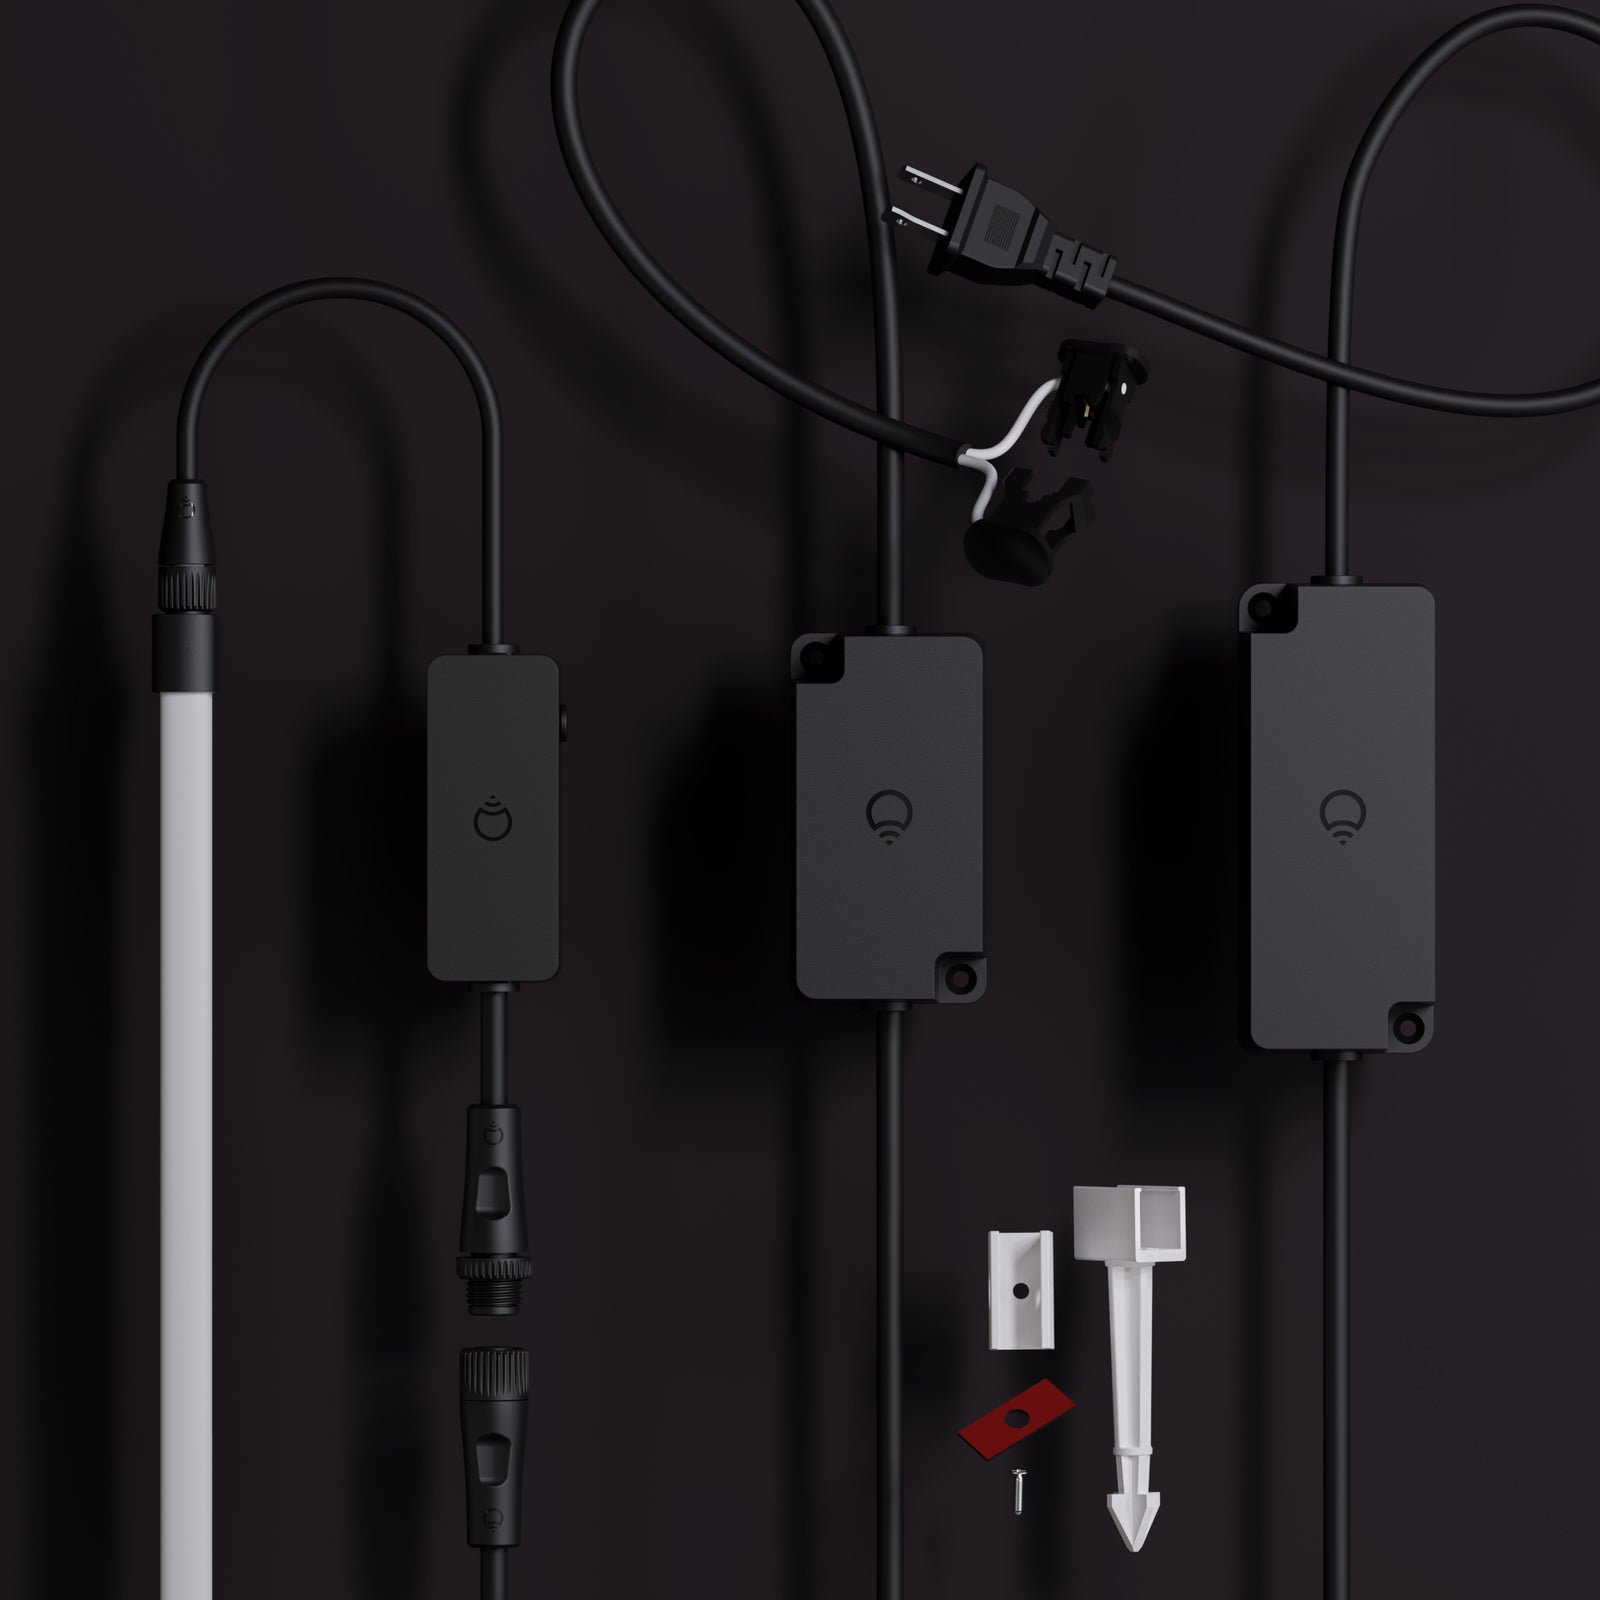
Everything you need to install and onboard your Neon Flex is included in the box. Pair with your existing low voltage system or use the main power supply provided.
In the box:
- 16ft LED rope light
- LIFX Wi-Fi smart controller
- Low voltage clamp connector
- Alternative mains power supply
- 10 x ground spikes
- 10 x screw mounts
- 10 x adhesive mounts
You’ll Need:
- A smartphone (iOS 18.0+ or Android 8.1+)
- The LIFX app (download from App Store or Google Play
- A 2.4 GHz Wi-Fi network (Most smart devices require 2.4 GHz. If your router combines 2.4 GHz and 5 GHz, that’s usually fine.)
- Your Wi-Fi password
Important Notes:
- Keep your phone near the light during setup.
- Make sure Bluetooth is enabled.
- Ensure your phone is connected to the same Wi-Fi network you want the light to use.
Installation type (choose one)
- Low voltage — connects to an existing 12V outdoor lighting transformer. Best if you already have a low voltage garden lighting system installed.
- Mains powered — plugs into a standard outdoor outlet. Best for new installs with no existing transformer.
If using low voltage
- Check your transformer has sufficient wattage available — you need at least 85W allowance remaining after wiring calculations
- Your system must be 12V
- Clamp the provided cable to your low voltage system wire, the same way you'd connect any other garden lighting accessory
If using mains powered
- Use a GFCI-protected outdoor outlet
- Do not use an extension cord unless the plug can be fully and firmly inserted — do not alter or replace the plug
Mounting method (choose one)
- Ground stake — for garden beds and soft soil
- Surface mount — for wood, masonry, pavers, or other solid surfaces using channels fixed with screws or double-sided adhesive
Ground stake steps
- Lay the Neon Flex out and bend it into your desired shape before fixing anything down.
- Press the ground stake firmly into the soil until fully seated. If the ground is hard, wet or loosen the soil first — a rubber mallet can help.
- Press the Neon Flex into the channel along its full length until it seats securely.
Surface mount steps
- Lay the Neon Flex out and plan your shape before attaching anything.
- Position the channels in the desired shape. For screws: attach through the holes provided. For adhesive: peel the backing and press firmly onto a clean, dry surface.
- Press the Neon Flex into the channel clips along its full length until fully seated.
Connecting to power (all mounting types)
- Ensure the product is disconnected from power before assembling or positioning.
- Connect the cable to the Neon Flex wire — align the two connector sides, then screw the cap over the join tightly to ensure a waterproof seal.
- Cap any unused connector ports — never leave a port uncapped outdoors.
- For low voltage: clamp the other end of the cable to your system wire at the transformer run, as you would any other garden lighting accessory. For mains: plug into an appropriate outdoor outlet.
Detection sweep & pairing
- Power on. If the flex was connected before you powered the controller, it will automatically run a detection sweep along the full length.
- If you connected the flex after powering the controller, press the button on the controller for 2–3 seconds. A light will run the full length of the Neon Flex as it detects it.
- Download the LIFX app (iOS 14+, Android 8+) and sign in. Tap + in the bottom right to add your light — connect to your 2.4 GHz Wi-Fi network when prompted.
- To use Matter, scan the code on the back of the manual from within your smart home platform. A Matter-enabled hub (Google, Apple, or similar) is required for home & away automations.
Tips
- Do not bury wire more than 6" underground.
- Ensure all connectors are tightly secured to prevent water entry — do not submerge the product.
- Do not secure wiring with staples, nails, or sharp hooks — do not damage the wire insulation.
- Keep the flex away from heat sources including heaters, fireplaces, and candles.
- Only connect to official LIFX Outdoor compatible products and accessories.
- To factory reset, hold the button on the controller for 5–7 seconds. This returns the device to original factory settings. Note: this is different from the detection sweep (2–3 seconds).
- LIFX connects to 2.4 GHz Wi-Fi only. If you have both bands, check your phone's Wi-Fi details to confirm which you're connected to before pairing.
Select your device below to get step-by-step setup instructions tailored to your phone. We recommend using the Matter QR code method for the quickest and most reliable connection — you'll find the QR code in your product manual, or printed on the back of your device.
Choose your OS
On iOS, you can set up in two ways
We recommend Matter for the most reliable setup. Use Wi-Fi if you've lost the QR code or can't access it.
iOS Onboarding via Matter QR code
- Plug in the light and power it on.
- Open the LIFX app and tap the + icon in the bottom right.
- Tap New Product, then New Light.
- Tap Scan QR Code and use the camera to scan. Alternatively, type the 11-digit Matter code from the product (or Manual).
- Tap Add to LIFX and Choose Home from the list.
- Wait for the Home app to connect to the light.
- Select a Location (e.g. Bedroom) and give it a Name (e.g. Bedside Lamp).
- You're all set.
iOS Onboarding via WiFi
- Plug in the light and power it on.
- Open the LIFX app and tap the + icon in the bottom right.
- Tap New Product, then New Light.
- Tap Set Up Device Manually.
- Go to your phone's Wi-Fi Settings:Matter: From Other Networks, select the LIFX Light.HomeKit: LIFX appears under Set Up New Device; after 15 minutes it moves to Other Networks. Select the LIFX Light from there.
- Return to the LIFX app.
- Select your Wi-Fi and enter the password.
- Wait for the light to connect via Wi-Fi (up to a minute).
- Finish setup by selecting a Group and giving it a Name.
- Opt in or out of any Suggested Routines.
- You're all set.
On Android, you can set up in two ways
We recommend Matter for the most reliable setup. Use Wi-Fi if you've lost the QR code or can't access it.
Android onboarding via Matter QR code
- Plug in the light and power it on.
- Open the LIFX app and tap the + icon in the bottom right.
- Tap New Product, then New Light.
- Tap Scan QR Code and use the camera to scan. Alternatively, type the 11-digit Matter code from the product (or Manual).
- Tap Add to LIFX and Choose Home from the list.
- Wait for the Home app to connect to the light.
- Select a Location (e.g. Bedroom) and give it a Name (e.g. Bedside Lamp).
- You're all set.
Android onboarding via Wi-Fi
- Plug in the light and power it on.
- Open the LIFX app and tap the + icon in the bottom right.
- Tap New Product, then New Light.
- Tap Set Up Device Manually.
- Select your new LIFX light when it appears.
- Select your Wi-Fi and enter the password.
- Wait for the light to connect via Wi-Fi (up to a minute).
- Finish setup by selecting a Group and giving it a Name.
- Opt in or out of any Suggested Routines.
- You're all set.